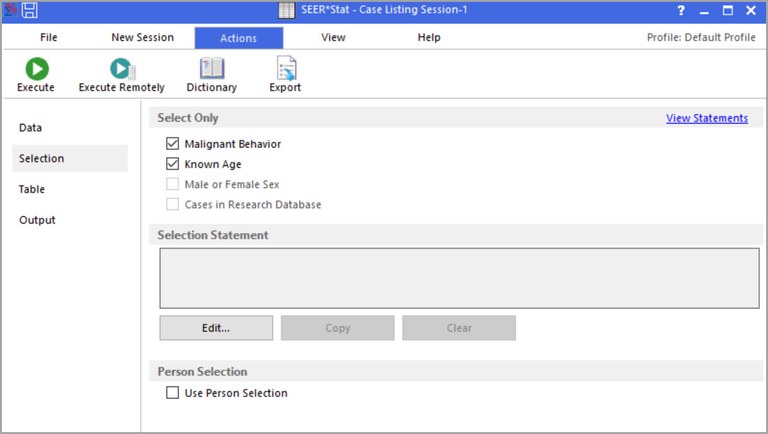
The Selection tab is used to select the records to be included in the case listing. If no selection statements are made on the Selection tab, all records in the database will be included. Selection statements reduce the number of records included in a listing based on specific variables in the case data files.
Select Only (Standard Selection)
At the top of each Selection tab is a box with check boxes that allows you to make the standard selections for frequency. The box is marked Select Only, but if Person Selection is used (see Person Selection below) the Select Only section becomes the Index Record and Other Selections section. The standard selections for the analysis of the database include.
- Malignant Behavior - Select this option to include only cases with a malignant behavior. The Behavior variable is part of the morphology of cancer. The SEER program only collects information on in situ and malignant cancers. If the behavior code is malignant, the case will be included in the analysis.
- Male or Female Sex - Select this option to include only cases where sex is either Male of Female (for example no cases of unknown or transgender patients).
- Known Age - Select this option to include only cases of a known age.
- Cases in Research Database - Select this option to include only cases in the selected Research Database.
View Statements Link
This link opens the Standard Selection Details dialog, which provides information on the standard options selected.
Selection Statement
The Selection Statement section is where you determine the records that will be included in your analysis. To add a selection statement click on the Edit button to open the Case Selection dialog. When the Use Person Selection checkbox is selected the title of the section changes to Index Record (For Each Person, First Record Matching the Following).
Using Person Selection for Case Listing Analyses
Since most of the SEER*Stat databases are multiple primary ready you will generally have the option to make selections using each person's tumor history by selecting the Use Person Selection checkbox at the bottom of the tab.
In a multiple primary ready database, each record represents a tumor or case, and the records are sorted chronologically. It is possible for a person to have multiple tumors. The Person Selection feature allows you to look at a person's entire tumor history, not just the records that match the tumor subset. To use this feature, open the Session menu and select Person Selection. When a check mark appears next to this item, it is turned on.
Index Record (For Each Person, First Record Matching the Following)
Use this box to define the index records. An index record is the first tumor in a person’s history that matches this statement. If this selection is left blank, the person's first record in the database is used as the index record.
Narrow the selection of persons
Use this feature to further subset people in the database. Using a person's first matching record from the above selection as the index record, you can narrow the search using the drop-down list boxes. Select to include only records for people with "at least", "at most", or "exactly", "0"-"99", "additional", "prior", or "subsequent record(s)". To further subset the output, click the Edit button next to the bottom text box, and create selection statements that the additional, prior, or subsequent record(s) must match.
For every selected person, include . . .
When you enable Person Selection for a Case Listing session, all cancers for each qualifying person will be included in the results matrix. You cannot change this. This section of the Case Listing Selection tab appears only for the sake of consistency with Person Selection for a Frequency session.
Example
Suppose you wanted to view the tumor history for people diagnosed first with stomach cancer, followed by colon cancer.
- Click the Edit button next to the first text box and create a selection statement for stomach cancer. This will create a subset of all records for those who have at least been diagnosed with stomach cancer.
- Check Narrow the Selection of Persons.
- From the drop-down list boxes, select "at least", then "1", then "subsequent record(s)".
- Click the Edit button next to the bottom Selection box, and create a selection statement for colon cancer.
- Make other changes as necessary and execute the session when ready.

