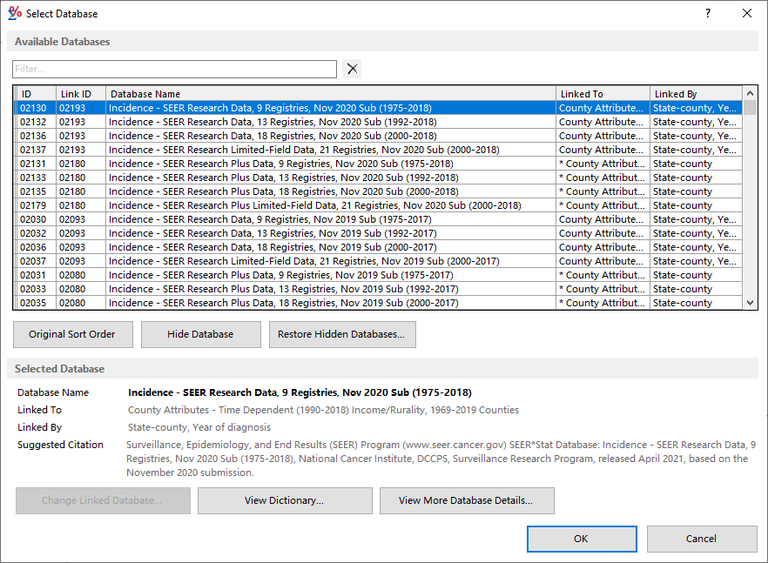
There are three ways that you might select a database for a session.
1. You are creating a new session and need to select a database for it. In this case, you will use the Select Database dialog to pick a database.
2. You are working with a session and want to change the database being used for it. In this case, you will use the Select Database dialog to pick a new database.
3. When you open or retrieve a session, the database being used for the session does not exist in any of your active data locations. In this case, you will use the Select Another Database dialog to pick a database from one of your active data locations.
Select Database dialog
To select a database from the Available Databases table, highlight it and click on the OK button. The available variables differ among databases. These variables will be used throughout the session in selection statements, on the Table tab, and in the dictionary. The databases listed in the Available Databases table are those in your active data locations, excluding any that are inappropriate for the type of session you selected. You can see more information on the databases and their variables by clicking on the View Dictionary button when a database is selected, and the View More Database Details... to open the NIH website to the SEER*Stat Databases page.
Note: If you cannot find an appropriate database for your analysis in the list of available databases you can edit your active data locations in Preferences.
Columns in the Available Databases Table
Depending on the type of session you select, the Available Databases table, has three or four columns containing information about each database available to you. You can sort the table by clicking on the column headers for Database Name, Linked To, Linked By, or Population Variables to sort the list alphabetically according to the contents of that column. An up or down arrow () next to the column name signals the column that's being sorted and whether it is in ascending or descending order.
Some databases are linked to other files that contain additional information about the records in the database. They are linked to these files by means of the variables listed in the Linked By column, which function like the relate key in a relational database: SEER*Stat matches each record in the original database with the record in the linked file that has the same values for those variables. Thus, the linked file can add many more fields to the records in the original database, avoiding the need to explicitly incorporate that data into each database that uses it. The linked files are themselves databases, and can be viewed in a Case Listing session.
- Database Name - The name of each database provides you with information about the type of data it contains and the type of analysis for which it should be used.
- Linked To - This column contains the name of the file to which this database is linked.
- Linked By - This column contains the name of the variable(s) shared by this database and the linked file.
- Population Variables (Rate and LD Prevalence sessions) - This column lists the names of each population variable used in the database.
Controls on the Available Databases Dialog
- The Original Sort Order button restores the database to the original order if you have sorted by one of the sortable columns.
Note: The original sort order is by database types and the number of SEER registries included in the data.
- The Hide Database button hides the database you have selected.
- The Restore Hidden Databases... button opens the Edit Profile dialog to the Databases section where you can select a hidden database to restore it.
- The Change Linked Database button becomes active when you open or retrieve a session that was created with a linked database that does not exist in any of your active data locations. The suggested citation for the highlighted database is displayed at the bottom of the Data tab. When you highlight a different database, the citation will be updated accordingly.
Note: Sometimes the database that was used in the original session has been updated and has a slightly different name. Click on the button to open the Select Linked Database dialog, where you can change the link to another database in your active data locations.
- The View More Database Details link appears next to the buttons whenever you select a database where there are more details available. When you click on the link it opens a page on the National Cancer Institute website where SEER database information can be found.
Note: If you cannot find a database that suits your purposes, see Using Your Own Data to learn how to create new SEER*Stat databases from text data files.
Once you have selected your database and clicked on the OK button the main window will display the Data tab. The Data tab is where you will find information about the database you have selected for this session.
Select Another Database dialog
When you open or retrieve a session that was created with a database that does not exist in any of your active data locations, the Select Another Database dialog is displayed.
The top of the dialog box contains a message asking you to select another database, and indicates the name of the database used originally. The bottom of the dialog is similar to the Data tab, allowing you to select a database by highlighting it.
See if an appropriate database for your analysis exists in the list of available databases. If so, select it and click OK. If not, click Cancel, and edit your active data locations in Preferences.


